There are two ways to import SolarAnywhere® Data into PVsyst for use in PV production modeling:
- Import the data directly into PVsyst using the SolarAnywhere API.
- Download SolarAnywhere Data from data.solaranywhere.com, and import the file(s) into PVsyst.
Option 1 is only available to SolarAnywhere Typical Year Unlimited or Enterprise customers.
Import using the SolarAnywhere API
SolarAnywhere Typical Year Unlimited and Enterprise customers can take advantage of our PVsyst API integration by following these steps:
- Generate an API Key or request an API key from the license manager of your SolarAnywhere Account.
- Open the Geographical site parameters, new site dialogue box by selecting Databases from the home menu, then Geographical sites>New, or by starting a new Grid-connected or Stand-alone project and selecting the new site icon next to Site file.
- Input the site coordinates within the Geographical Coordinates tab, or navigate to the site within the Interactive Map tab.
- Select the SolarAnywhere® TGY bubble in the Meteo data Import menu, then select Import.
- Input your SolarAnywhere API Key and select Okay.
Once an API key is used to import SolarAnywhere data into PVsyst, the key will be stored for future use. You can view or edit the stored API key by viewing the Network tab in the PVsyst Settings>Preferences menu. The following video demonstrates this import process.
Import a downloaded SolarAnywhere file
SolarAnywhere® typical-year or time-series data can easily be imported into PVsyst versions 6.85 and later by following a few simple steps:
- Download typical-year or time-series data from SolarAnywhere in SolarAnywhere output format.
- Open PVSyst and select Known Format under Import and generate weather data in the Weather Database.
- Select “SolarAnywhere (Worldwide) 1998-today” from the External Data Source drop-down menu.
- Choose the SolarAnywhere typical-year or time-series file.
- Select the correct Country and Region, or select “Get from coordinates” to let PVsyst complete this step for you.
- Select Import.
The following video demonstrates this process and provides additional information about importing TMY3 format SolarAnywhere files into PVsyst.
Note that if you’re planning to use the relative humidity field in your PVsyst projects, download and import your SolarAnywhere data in the native SolarAnywhere format. While you can include relative humidity data in TMY3 format downloads, PVsyst cannot read this field when you import the data in this format.
Import a sub-hourly SolarAnywhere file
To apply sub-hourly clipping correction with PVsyst versions 8.0.0 and later, sub-hourly SolarAnywhere typical-year or time-series files must be imported using the following steps:
- Download sub-hourly typical-year or time-series data from SolarAnywhere in SolarAnywhere output format.
- Open PVSyst and select Custom File under Import and generate weather data in the Weather Database.
- Choose the SolarAnywhere sub-hourly typical-year or time-series file.
- Select or create a new Site that matches the geographical coordinates of your SolarAnywhere file.
- Modify the internal PVsyst file descriptions as necessary.
- Select a conversion protocol (*.MEF) file from the drop-down menu or create your own by selecting New. See below for more information on conversion protocol files.
- Select Conversion.
Instructions on creating your own conversion protocol file are available on the PVsyst documentation. For your convenience, conversion protocol files for SolarAnywhere format files are available below. The *.MEF files must be placed in your PVsyst Meteo directory to access them within the application (Default location of C:\Users\Username\Documents\PVsyst\PVsyst8.0_Data\Meteo). Probability of exceedance files can be imported using the Typical Year *.MEF files.
Download *.MEF Files
Import a SolarAnywhere far-shading file
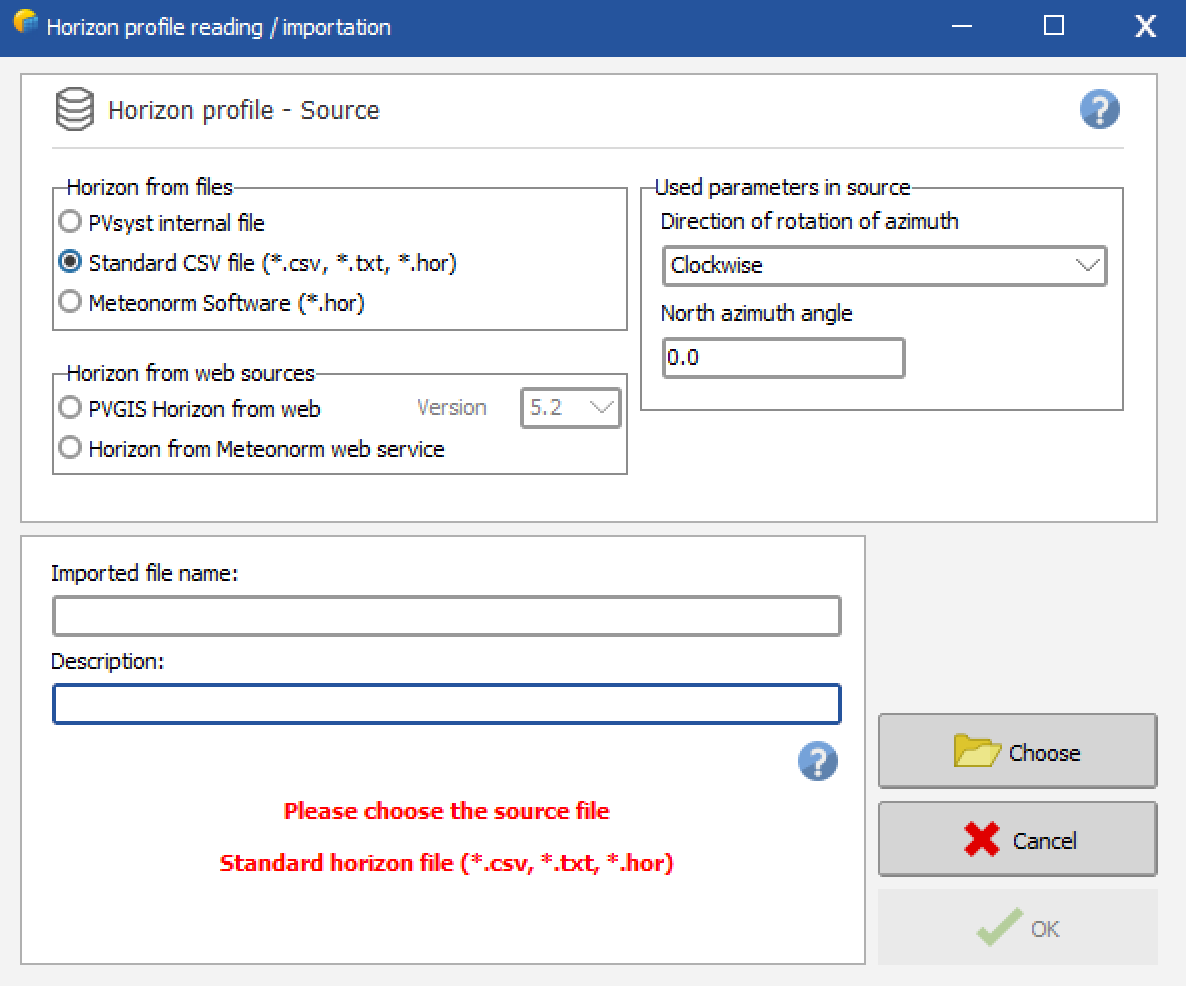
SolarAnywhere far-shading files may be imported manually into PVsyst by choosing the “Standard CSV file” option while specifying the direction of rotation of azimuth as clockwise and the north azimuth angle as 0 degrees (shown below):
If you run into an error, contact us at support@solaranywhere.com.
June 12, 2024 Data Import Notice: After the SolarAnywhere V3.8 launch, there was a known issue regarding the upload of SolarAnywhere files into PVsyst. Updates were also be provided on the PVsyst forum. This issue has been resolved for files downloaded after August 16th, 2024.
Impacted Versions
- 8/16/2024 UPDATE: Files downloaded after August 16, 2024 have updated column header names that allow for the correct import of wind speed values into PVsyst. No further action is required.
- ALL SolarAnywhere format files created since June 12, 2024 – August 16, 2024, are affected by this issue regardless of data version, TMY3 format files can still be uploaded as normal.
- This does not affect the API integration import method.
Quick Fix for Files Downloaded June 12, 2024 – August 16, 2024
- Existing files can be altered and uploaded to PVsyst by deleting the “Wind Speed 100m (m/s)” column header in row 2 from the meteo file before uploading. This will ensure that correct 10m Wind Speed is uploaded as opposed to 100m Windspeed (V3.8 files) or zero windspeed (V3.7 and earlier).
- For further questions please reach out to our Customer Success Team at support@solaranywhere.com.

